
When I learned to crochet in 2012, I imagined sweaters to be the ultimate "look-I-can-really-crochet" project. There were so many styles, options, techniques, and finishings—the list goes on and on! What I've learned in the last decade, however, is that crocheting a sweater does not have to be an insurmountable task. If you are comfortable with basic crochet stitches and stitch increases/decreases, you are likely ready to jump into your first top-down sweater project!
About the Recipe
In my crochet patterns, I am a huge fan of pattern recipes. Like a recipe you would find in a cookbook, my crochet recipes feature instructions thoughtfully designed to guide you through the process of making something. My Basic Raglan Recipe is just that: basic. It will walk you through the steps of gathering materials, selecting your yarn(s), and embarking your sweater journey. It does not provide prescriptive row/round/stitch counts, nor does it include an illustrated schematic or instructional photo tutorial. Why? Put simply, the skilled labor required to fully grade, tech edit, and self-publish a sweater pattern would not be free (at least, not on my blog). Instead, here I give you the framework to get started and encourage you to find the beauty in experimenting, customizing, and playing with your sweater.
 |
| Crochet raglans are easily identified by their long, slanted shoulder seams created by V-stitches. |
What is a Raglan Sweater?
Raglan sweaters are easily my favorite type of garment to both wear and make. They are a classic style defined by their long, slanted shoulder seams, which run across the front and back of the garment. Raglans are known for their comfort and ability to move with you, which is why you often see them in athletic wear.
Makers often praise raglans because of their construction; they are typically created in a single piece from the top down, so you have minimal seams to sew together and you can try on your project as you stitch. Win-win!
Materials
- Yarn for the body of the sweater and ribbing*
- Crochet hook in a corresponding size
- At least 6 stitch markers
- Scissors
Optional:
- Spray bottle
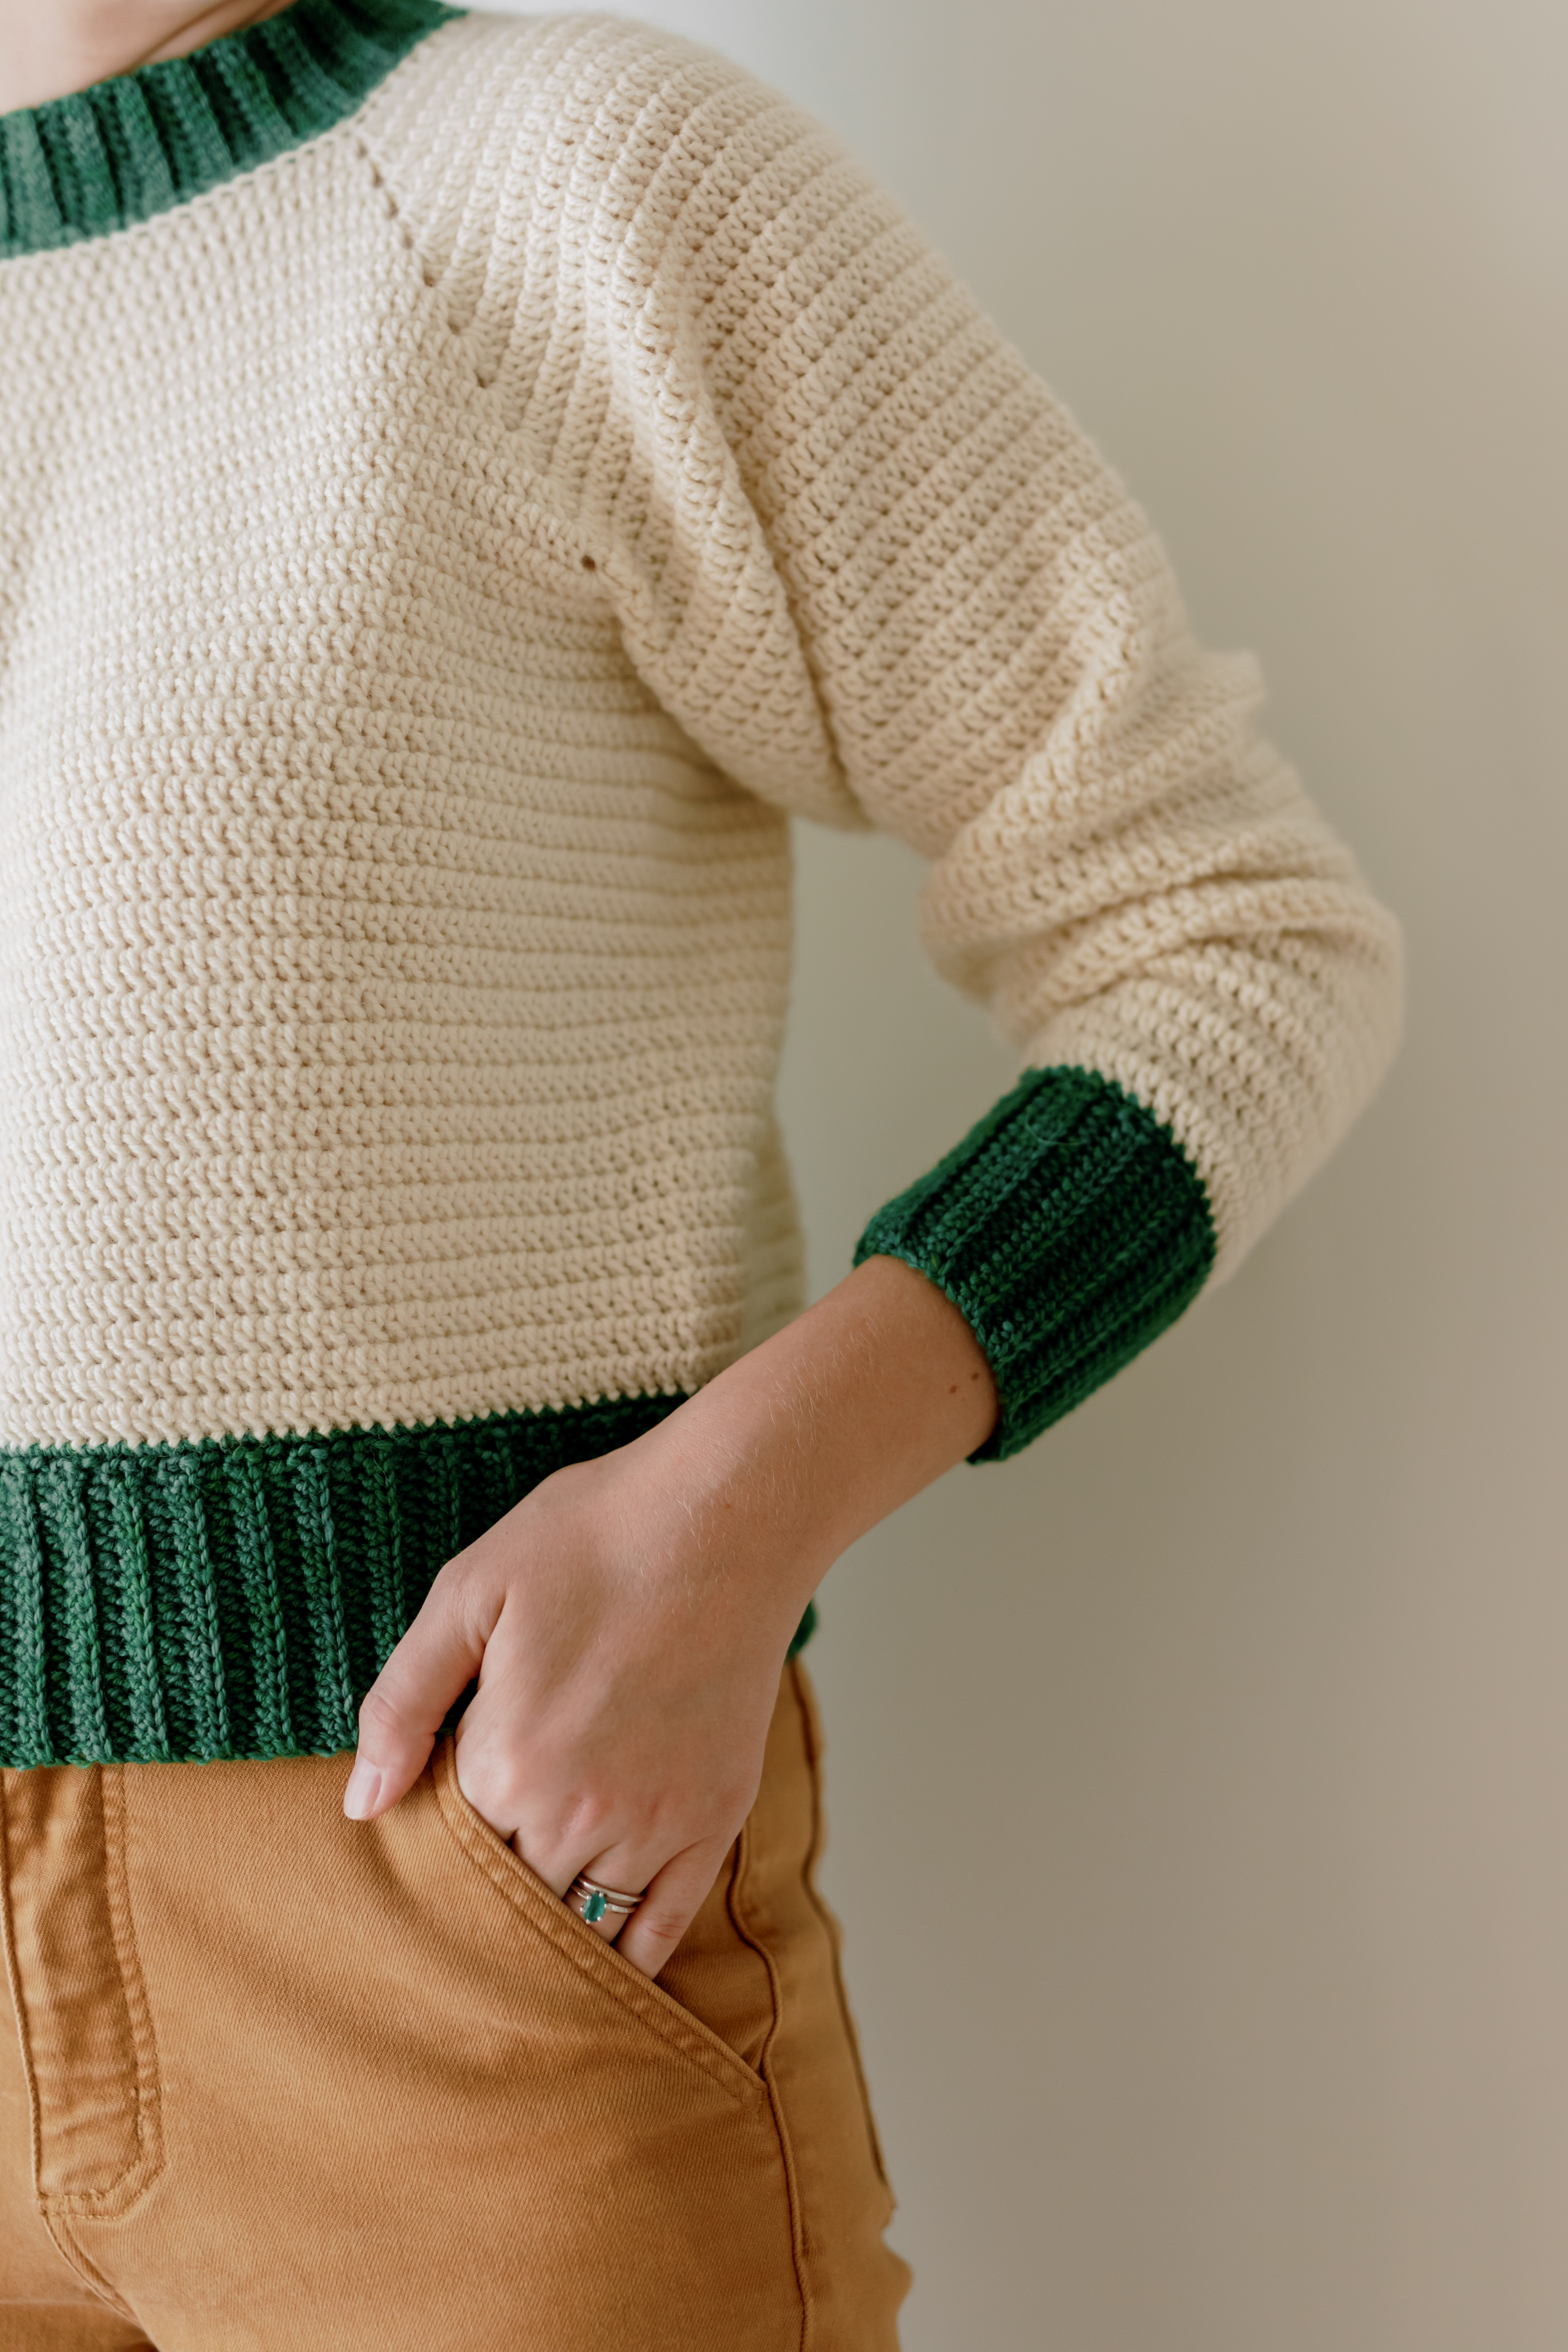
*In the sample sweater shown in the photos, I used bare yarn from Wool2Dye4 and the colorway Moss from Winnie Jo Fiber Co, both DK weight in superwash Merino. I love working with bare yarn on a cone because the yarn will come in one long piece, so I have fewer ends to sew in. Ribbing is a great opportunity to play with color, and one of my favorite indie yarn dyers is Winnie Jo Fiber Co - she has such a wonderful selection of variegated, speckled, and tonal yarns! You may use any yarn weight for this recipe, keeping in mind that the weight of the yarn will impact how heavy your finished sweater will feel (the thicker the yarn, the heavier the sweater).
 |
| My favorite yarn weight for crochet sweaters is DK: the perfect combo of cozy but not too heavy! I am holding the "extra" yarn from my sweater, a cone of undyed yarn and a cake of Winnie Jo Fiber Co. |
Selecting Your Yarn
Like many makers, I adore selecting my yarn for a project! There's so many options to choose from, and I encourage you to consider what you value in a yarn. There is truly no "right" answer when picking yarn for a sweater—it all depends on how you want your sweater to feel, your budget, if you want to be able to pop it into your washing machine, etc.
When I am crocheting a sweater, I gravitate to the following:
- Superwash or Non-Superwash Yarn: Put plainly, superwash is any chemical and/or physical process that makes wool machine-washable. It can be awesome for so many projects, but it tends to be a bit slippery and may not hold its shape as well as a non-superwash yarn (particularly if my project will be oversized and bulky in its shape, or worked in the round). When making something oversized, I will typically go for non-superwash yarn. But, superwash yarn is often readily available from indie dyers and at my local yarn shop—so either works for me!
- Merino Wool or Merino-Cotton Blend: When I crochet a sweater, it needs to feel good on my skin. My favorite yarns to wear close to my body are Merino wool or Merino-cotton blends. Merino is wonderful at helping keep your body at a stable temperature: when it's cold outside, the natural texture in its fiber traps air, insulating you; when it's warm outside, it quickly moves sweat away from the skin. Merino is also a very common fiber, so there are many colorways, brands, and indie dyers to choose from. I also love Merino blended with cotton, which can help my finished sweater feel softer with a less regular texture.
- DK Weight: DK yarn is equivalent to a #3 Light on the Standard Yarn Weight System, which means it is a great pick for lightweight garments. If I want a warmer sweater, I will go up to worsted weight. I simply do not have the patience (currently...) to crochet a sweater using fingering weight yarn, so when I love a fingering weight yarn color, I will hold it double in order to make that thin fingering weight yarn closer to a DK weight yarn.
The Recipe
This recipe uses US crochet terminology, with minimal jargon or abbreviations. As a basic recipe, it does not provide prescriptive row/round/stitch counts or indicate where you may wish to change colors. The sample raglan shown in this post features contrast ribbing with bare (undyed) yarn for the body and arms.
Yoke
A raglan is crocheted from the top down, so you will start with the neckline and then work your way down the body of the sweater. (The sleeves are added after the body.) Raglans are typically worked as a square or as a rectangle, depending on the desired fit.
 |
| This illustration demonstrates the construction of a rectangular yoke in a raglan sweater. |
I recommend starting with a foundation single crochet row, which will be the base of your neckline. A foundation single crochet starts with a chain and then adds the single crochet, so you are making two elements in a single stitch. The result is a foundation chain that has a good amount of stretch to it, making it more comfortable and forgiving when you fit it over your head.
For the sample rectangular raglan seen in this post, my foundation single crochet row is 96 stitches long. The key is that this row needs to fit comfortably over your head when joined with a slip stitch. If it doesn't, you need to make it longer.
The number of stitches in your foundation chain is important and unique to your sweater recipe. If you want a square raglan, the total number of stitches should divide evenly by 4. Remember to include 4 extra stitches for the corners of your raglan; if you want each side to be 20 stitches, you need 84 total foundation single crochet stitches (20 + 20 + 20 + 20 + 4 = 84). If you want a rectangular raglan, you will need two smaller sides for the shoulders and two longer sides for the front and back of the sweater. My sample features a rectangle, with 40 shoulder stitches (20 for each shoulder), 52 front and back stitches (26 each side), and 4 corner stitches (40 + 52 + 4 = 96).
With the right side of the sweater facing you, chain 2. Place a double crochet stitch in the same first stitch. You will now be placing double crochet stitches along the round until the first corner stitch. This will be the start of the body of your sweater; I like to keep the seam created by each round at the center back of my sweaters, so the first corner stitch will be the halfway point of my back side. This will keep the seam running down the center back of my sweater.
 |
| The corners of a raglan are typically created using a V-stitch, which may be as basic or ornamental as you choose; I kept mine simple in this example. |
All About Corner Stitches
The corners of a raglan are typically created using a V-stitch. This can be done many ways, varying from ornamental bobbles and puff stitches to simple stitches matching the body of the sweater. For this recipe, I placed the following stitch pattern into the same stitch to create the corner V-stitch: 2 double crochet stitches, chain 2, 2 double crochet stitches. I place a stitch marker in my chain 2 so that I never accidentally skip a corner stitch when working the yoke. When working subsequent corner stitches, I will be working into the chain 2 space (not actually into the chain stitches, just into the space below them!).
V-stitch: 2 double crochet stitches, chain 2, 2 double crochet stitches (all in the same stitch)
Your raglan will have a total of 4 V-stitches, one in each corner of your square or rectangle. These increases create your square or rectangle and are your sweater's stitch increases. Because you are placing several stitches into the same stitch of each corner, you are increasing by 16 stitches each subsequent round.
I continued my yoke for 15 rounds, joining each round with a slip stitch to the first stitch of the prior round before chaining 2 and placing a double crochet stitch in the same stitch. The double crochet stitch counts as your first stitch (not the chain 2). Do not turn between rounds.
Separate for the Body / Underarm Chains
Continue to crochet your yoke until it is large enough to both:
- Get it under your arms
- Get it around your body
When the yoke fits comfortably over your head, under your arms, and around your body, it is time to continue crocheting only around the body. To do this, you will need to connect the front and back of your sweater, skipping the sides designated for your shoulders/sleeves. This will end your yoke and allow you to focus on crocheting your sweater to your desired length.
When you separate for the body, you will:
- Fold your yoke in half, lining up the shoulder corners so that they connect. I like to hold mine in place with stitch markers as I join them.
- Begin to crochet your next round. This will be the first round of the body. When you reach the first corner V-stitch, place 2 double crochet stitches into the V-stitch and then chain 3 (or any number of chains to ensure a comfortable fit around your body).
- Skip the sleeve section.
- Place 2 double crochet stitches into the next V-stitch.
- Crochet until the next V-stitch and repeat the above steps until you complete the round.
 |
| The body of the sweater is my favorite step because it's so simple - you continue stitching around and around! |
Body
To crochet the body of your sweater, simply continue to stitch each round with the following pattern: Chain 2, double crochet around (starting the first stitch of the prior round, plus into the underarm chains), slip stitch to join to the prior round. Chain 2 does not count as your first stitch.
Continue to crochet around and around until you are happy with the body length. Remember to leave a few inches for the ribbing! Rounds 16-40 completed the body of my sample sweater.
Sleeves
To crochet the sleeves of your sweater, you will join your yarn with a slip stitch to the middle underarm chain used to separate the body of your sweater from the sleeves. Then, place double crochet stitches around the entire opening of the sleeve (remember to go in the same direction as the body of your sweater, so that the stitches are all oriented in the same direction and do not look backwards or reversed). To prevent large gaps from forming in the corners of your underarm chains and double crochet stitches, double crochet 2 stitches together.
Join each round with a slip stitch and chain 2 before placing your first double crochet stitch, as you did in the body of your sweater.
There are several options for sleeve types: you can continue with double crochet stitches evenly placed around the opening for the entire sleeve, which will create a full, balloon-look cinched by the ribbing at the wrist. You can introduce stitch decreases as you near the end of your sleeve, to create a more tapered look. Or, like in my sample, you can begin decreasing your stitches around your elbow; I made my stitch decreases as double crochet 2 together, alternating one decrease at the start and end of my rounds.
 |
| There are so many ways to personalize your sweater during the ribbing section: play with color, keep it loose, experiment with cinching, get adventurous with texture—it goes on and on! |
Ribbing
My favorite part of any sweater is the ribbing! I love adding fun contrast colors here and the style of ribbing you choose can really change your sweater's fit. My two go-to ribbing styles are 1) alternating front and back post double crochet stitches worked around the piece, and 2) back loop only stitches worked perpendicular to the piece.
For this sample sweater, I alternated front and back post double crochet stitches. The ribbing at the waistband used the following pattern:
- Round 1: Chain 2. Place a double crochet stitch in this very first stitch and continue to double crochet around. Slip stitch to your second chain to join.
- Round 2: Chain 2. Place a front post double crochet in your very first stitch of the prior round. Alternate back post double crochet and front post double crochet stitches around the entire round. Slip stitch to your second chain to join. Depending on how many stitches you have in your round, you may need to slightly fudge the pattern by adding an extra post stitch.
- Repeat Round 2 until you reach your desired length and then fasten off. I crocheted 10 rounds total.
For the ribbed cuffs, I used the following pattern:
- Round 1: Chain 2. Place a double crochet stitch in this very first stitch and continue to double crochet around. Slip stitch to your second chain to join.
- Round 2: Chain 2. Place a front post double crochet stitch around the next two stitches; I like to think of it as working one post stitch around two posts. Alternate one back post double crochet stitch and one front post double crochet stitch worked around the next two stitches until you complete the round. As you did for the waistband, you may need to add an extra post stitch, as needed. Slip stitch to your second chain to join.
- Round 3: Chain 2. Alternate front post double crochet and back post double crochet stitches around the entire round. Slip stitch to your second chain to join.
- Repeat Round 3 until you reach your desired length and then fasten off. I crocheted 10 rounds total.
For the ribbed neckline, I used the following stitch pattern:
- Round 1: Join your yarn using a slip stitch, attaching your new yarn to the center back of the neckline. Chain 2. Double crochet around the entire round. You should have the same number of stitches as you did in your foundation single crochet. Slip stitch to your second chain to join.
- Round 2: Chain 2. Alternate front post double crochet and back post double crochet stitches around the entire round. Slip stitch to your second chain to join.
- Repeat Round 3 until you reach your desired length and then fasten off. I crocheted 5 rounds total.
Finishing
I am a huge fan of blocking sweaters to set the stitches! It might seem like a superfluous extra step, but I adore how even it makes my stitches look and it gives me the opportunity to gently stretch the sweater to my ideal final size. To do this, I prepare a spray bottle with a mixture of water and wool wash. After placing my sweater on the blocking mats, I then lightly spritz my sweater with the water-wool wash mixture, setting the sweater's shape with pins. I prefer to block prior to sewing in my yarn ends. as blocking can stretch out my stitches; I also do not like to fully submerge my sweater in water, which can stretch out my sweater way too much!
To complete your sweater, use your blunt tapestry needle to move all yarn ends to the inside of your sweater. Flip your sweater inside out and use a sharp darning needle to carefully sew the ends into the interior of your sweater. Cut any excess yarn that remains. In places where I changed yarns, I like to secure both yarn ends together with a small knot before sewing. Once all yarn tails are sewn, flip your sweater right side out. Voila—you're finished!

Looking Ahead
Thank you, thank you for inviting me to share my Basic Raglan Recipe with you! Ever since I debuted my original crochet sweaters on Instagram last year, I've been asked again and again to publish the corresponding patterns. This is the closest I've come to writing a sweater pattern down, but please do let me know if you would be interested in seeing this as a published (paid) pattern with a complete step-by-step photo tutorial, graded for multiple sizes with a detailed schematic, yarn usage, instructions for short rows, etc.
This pattern and its associated images are protected by U.S. copyright and are the property of Stitchery & Co. It is illegal to publish your own version of this work, with or without alterations, corrections, clarifications, translations, etc., or to claim any part as your own creation. You may re-share this post with explicit credit to Stitchery & Co., including a direct URL link to this page.
This page contains affiliate links to external sites, including Amazon. If you choose to purchase after clicking a link, I may receive a commission at no extra cost to you.


This is a fantastic article, Allison!
ReplyDeleteThis is so helpful! Thank you! I am unclear on one point though...is the yoke crocheted in the round or in rows. I thought it was in the round until you mentioned a seam down the back.
ReplyDeleteGreat question! The yoke is made in rounds, but because you join and start new rounds while you crochet the yoke (and the body of the sweater), there will be a slight seam created. I like to keep this in the center back of my sweater, but others have concealed it more under the underarm. It's not a seam in the sense that you are seaming rows together. Hope this helps! :)
Delete